

The need to be able to find your heated environment when you return is a necessity that everyone must meet, and here it is born “DST”, the SOULISS digital thermostat based on the WiFi ESP8266-12 chip, connected to the 3.2 inch NEXTION HMI display allows you to manage your heating from a local area using a touch screen graphic interface, The DST can also be managed by SoulissApp (Play Store) both locally and remotely.
The graphic interface is divided into two different pages, the HOME PAGE and the PAGE SETTINGS:
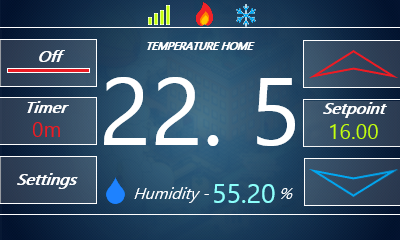
INFO: Temperature and Humidity, ntp time, Setpoint set, WiFi connection status to the local router, System power status, Heating status Timer, Icon of light blue color when the temperature is below 17 ° C
CONTROLS: System power button, Setpoint setting, setpoint ECO, NORMAL, COMFORT timer 60m, 120m,
The timer function if set, will turn off the heaters at the end of the time …. if the timer will not be activated and the heating will be turned on leaving the decision to us, the timer will still count the time since the start, and if we decide later to to activate a time established by the timer menu, automatically it will decide the time already elapsed from the switching on.

The “DST” code is based on the Souliss Framework, and hosts the Telegram bot that alerts you in real time on your smartphone when the system and / or the heating systems are switched on or off. Update home page


COMPONENTS USED:
NodeMCU Esp8266-12 3.2 “Nextion DHT22 Temperature & Humidity sensor Relay ON / OFF Boiler For those who do not know what Souliss is, please read the corresponding wiki at https://github.com/souliss/souliss/wiki.
HOW TO START TO REALIZE THE PROJECT
First we need to install the necessary software on the PC to load the firmware on the ESP8266 chip Then download the 1.6.12 .zip version of the IDE Arduino, https://www.arduino.cc/en/Main/OldSoftwareReleases#00xx once downloaded we create a portable folder in C: \ programs and extract our IDE to ‘ inside the newly created folder.Done this we launch the IDE program from the .exe file, once started we must install the ESP8266 cores, here I report the extract taken from the ESP8266 support site http://esp8266.github.io/Arduino/versions/2.0.0/doc/installing.htmlCORE
ESP8266 Core installation:
-
Start Arduino and open Preferences window.
-
Enter http://arduino.esp8266.com/stable/package_esp8266com_index.json into Additional Board Manager URLs field. You can add multiple URLs, separating them with commas.
-
Open Boards Manager from Tools> Board menu and find esp8266 platform.
-
Select the version you need from a drop-down box.
-
Click install button.
-
Do not forget to select your ESP8266 board from Tools> Board menu after installation.You may optionally use the staging boards manager package link: http://arduino.esp8266.com/staging/package_esp8266com_index.json. This may contain some new features, but at the same time, some things might be broken.
You can always check the cores supported by Souliss at the following link If something is not clear, read this article http://souliss.github.io/media/how-to-load-a-sketch-on-ESP/ https://github.com/souliss/souliss/wiki/Supported%20Hardware#expressif-esp8266-based-board
After installing the ESP cores, we close the IDE, pick up the necessary libraries from my github repository at the following link
https://github.com/Giuseppe-P/souliss-DST-CODE and the stable souliss framework
https://drive.google.com/drive/folders/0BzyjHRwlzov4SmFkUXNNcFJ0LTg and once downloaded, copy the folders inside the path C: \ Users
xxxxx \ Documents \ Arduino \ libraries, now the IDE is ready to load the DST sketck “always available from my repository” on the
ESP8266 chip.
TELEGRAM CONFIGURATION
Download and install the Telegram App from your Play Store, done this, for the creation of the bot I invite you to faces page at the following link http://www.nigiara.it/telegram/come-aprire-i-bot-su-telegram.htm
Without this we need the ID of the chat easily available by following these steps
First we start the chat by clicking on the button just created and type the command /start
So we open any browser at the address
https://api.telegram.org/bot
replacing
FLASH SKETCH DST
I preferred to use the board nodeMCU ready for the USB connection, so before connecting it to the PC to load the sketch you need to set the ESP bootloader, and to do this just hold down the flash button on the board and then insert the cable usb to the pc.Now open the .ino file and automatically open IDE, and set the following parameters
- Board as Generic ESP8266 Module
- Flash Mode QIO
- Flash Frequency 40 MHz
- CPU Frequency 80 MHz
- Flash Size 4M (1M SPIFFS)
- Upload Speed 115200
Now you have to enter some parameters in sketch necessary to make the ESP work, consequently enter your SSID and PASWORD for Wifi, enter the required data for telegrams to receive status notifications,and upload the sketch to the board.
The first time the sketch is loaded via cable, subsequent updates can be uploaded via OTA http://esp8266.github.io/Arduino/versions/2.0.0/doc/ota_updates/ota_updates.html
NEXTION CONFIGURATION
First of all, download the https://nextion.itead.cc/resources/download/nextion-editor/ software from the following link and install it on your PC.
To load the firmware on the nextion we need a FTDI serial converter, I used the CP2102 and connected as follows
NEXTION——- ->FTDI GND————->GND TX————–>RX RX————–>TX 5V————–>5V
This done open the .HMI file downloaded from my repository, the program will open and the only thing you need to do to load the firmware on the nextion, is to click on the upload button
Once the loading is completed on the NEXTION we are ready to put into production our DST, connecting the coma components from the following diagram

After installation in the sApp we will have the Temperature slot, the Humidity slot, the Heating slot, the digital Input slot that will switch its status according to the boiler on or off, and the slot to dim the brightness of the nextion display.
Create your case and your frame according to your needs, I do not have 3D print files or preconfigured accommodation, this is just the hw / sw project.
I have adapted a frame for three buttons and I glued the display with hot glue and inserted the electronic board in the back space.
Controll remote openHAB or Souliss App

The system requires 5v 1.5a power supply
I hope I will be a great contribution.
Giuseppe Preite