This tutorial will make your Souliss Node able to send notification to Pushbullet through Thinkspeak, in this example we will notify the state of lamp controlled by a relay.
This tutorial applies on all nodes that has internet connection via W5100 (for AVR based boards) or ESP8266, in case of W5100 is suggested to run the code on an Arduino Mega or any other AVR with larger RAM than a standard Arduino UNO or similar.
Start from a basic example like e01_HelloWorld for W5100 Ethernet based devices or e01_Hello_ESP8266 for ESP8266. Add the following code to your Arduino sketch, first we got to declare ThingSpeak API and ThingSpeak server, add this in top of your sketch
// ThingSpeak API
const char* apiKey = "Your ThingSpeak API key";
const char* serverTS = "api.thingspeak.com";
In your Souliss Node sketch you should have a code to push the output state, this can be added after the Logic_SimpleLight() call, your sketch will looks like:
FAST_50ms() {   // We process the logic and relevant input and output every 50 milliseconds
   Logic_SimpleLight(MYLEDLOGIC);
   DigOut(OUTPUTPIN, Souliss_T1n_Coil,MYLEDLOGIC);

   sendOutputState(MYLEDLOGIC);
}
Here we define the sendOutputState that will push your data, place this before void loop(){}
  // send data to ThingSpeak.com
  void sendOutputState(uint8_t slot){

	   // If there is nothing to show
	   if (!isTrigger())
         return;

       WiFiClient client;
       if(!client.connect(serverTS,80)) {  //   "184.106.153.149" or api.thingspeak.com
          Serial.println("Connection Fail!");
        }
        else {
          String postStr = apiKey;
                 postStr +="&field1=";
                 postStr += String(mOutput(slot));
                 postStr += "\r\n";

                 client.print("POST /update HTTP/1.1\n");
                 client.print("Host: api.thingspeak.com\n");
                 client.print("Connection: close\n");
                 client.print("X-THINGSPEAKAPIKEY: "+apiKey+"\n");
                 client.print("Content-Type: application/x-www-form-urlencoded\n");
                 client.print("Content-Length: ");
                 client.print(postStr.length());
                 client.print("\n\n");
                 client.print(postStr);
                 Serial.println("Send Relay State to Thingspeak");

        }
  client.stop();
  Serial.println("Client to send Stoped");

}
Now we need to setup ThingSpeak Channel, ThingHTTP and React, but first you will need Pushbullet token, so create pushbullet account, then create ThingSpeak account. And follow those steps:
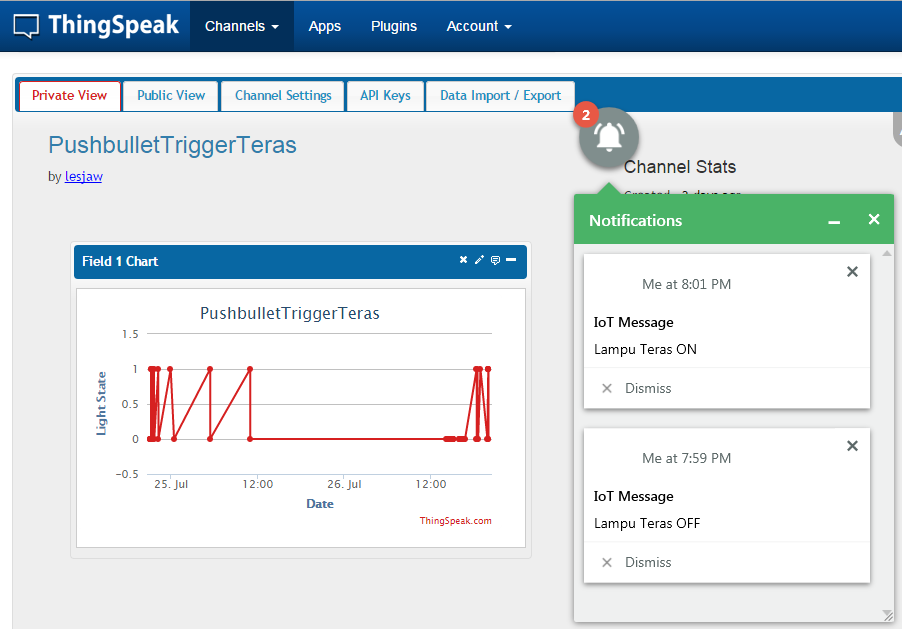
Create New Channel in ThingSpeak, name it as you wish, in my case “PushbulletTriggerKamar”. Make sure you have one field, use field 1 and name it as “Relay State”

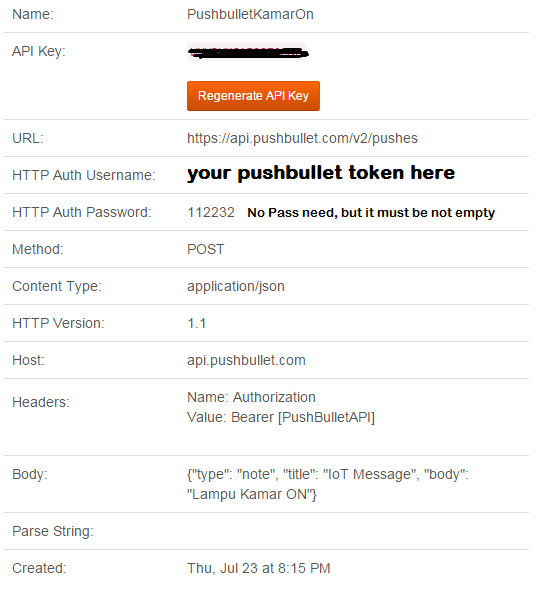
Click APPS in ThingSpeak, and click ThingHTTP app, create new ThingHTTP, this will send http request to pushbullet if the Light ON, fill the field as the picture
Create another ThingHTTP for the Light OFF, follow the picture below..
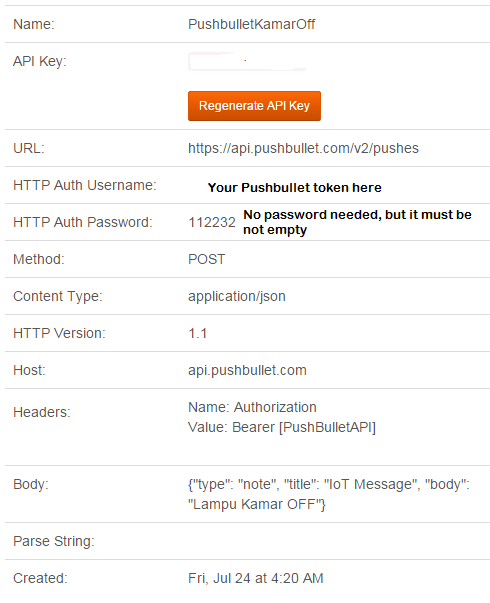
You can change the text body to fit your need, but it must be in json format.. I suggest just change this line
` {“type”: “note”, “title”: “IoT Message”, “body”: “Lampu Teras ON”} `
into something like this :
` {“type”: “note”, “title”: “Message from Home”, “body”: “LIGHT ON”} `
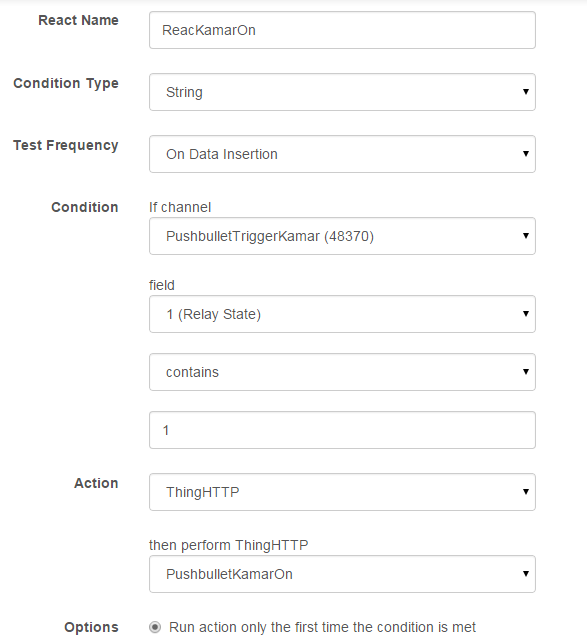
Back to ThingSpeak APPS, now click React app, create new React, this will execute ThingHTTP is some condition meet.. we create a new React for Light ON
Last step, create another React for Light OFF

You are done, now everytime you pressing ON OFF button in SoulissApp you should get notification in Pushbullet.