This is tutorial how to setup Eclipse Arduino IDE to compile sketches using Souliss.
I assume you use Windows (Windows 7 64-bit in my case) - for other operating systems there are minor differences.
Download and install
Download Arduino IDE Bundle
I recommend to download whole bundle: Eclipse + Arduino IDE plugin in stable version V2.4_win64.2015-12-06_20-24-02
http://eclipse.baeyens.it/stable-win.html
Select 32 or 64 bit version, according to your Windows version.
I choose 64-bit version and downloaded V2.4_win64.2015-12-06_20-24-02.tar.gz file.
Unpack Eclipse Arduino IDE
Unpack V2.4_win64.2015-12-06_20-24-02.tar.gz using for example 7-zip, to any directory without spaces in name.
In my case it is: C:\Apps\eclipseArduino-V2.4_win64.2015-12-06_20-24-02\
Download Arduino IDE 1.6.5
You need exactly that version - 1.6.5!
Page: https://www.arduino.cc/en/Main/OldSoftwareReleases#previous
I recommend Windows ZIP file for non admin install: http://arduino.cc/download_handler.php?f=/arduino-1.6.5-r5-windows.zip
So you need to unpack arduino-1.6.5-r5-windows.zip to any directory.
In my case it is: C:\Apps\arduino-1.6.5-r5\
You can also use Windows installer, but remember to use correct Arduino installation path later.
Download make.exe
Windows users need make utillity, because it is no more in Arduino.
Download from ftp://ftp.equation.com/make/32/make.exe and place on your PATH or in your Arduino IDE hardware\tools\avr\bin directory.
In my case it is: c:\Apps\arduino-1.6.5-r5\hardware\tools\avr\bin
Configure Eclipse Arduino IDE
Launch eclipseArduinoIDE.exe
Configure Arduino plugin
- Enter Preferences: Menu Window, Preferences
- select Arduino on the left tree
-
Enter correct paths
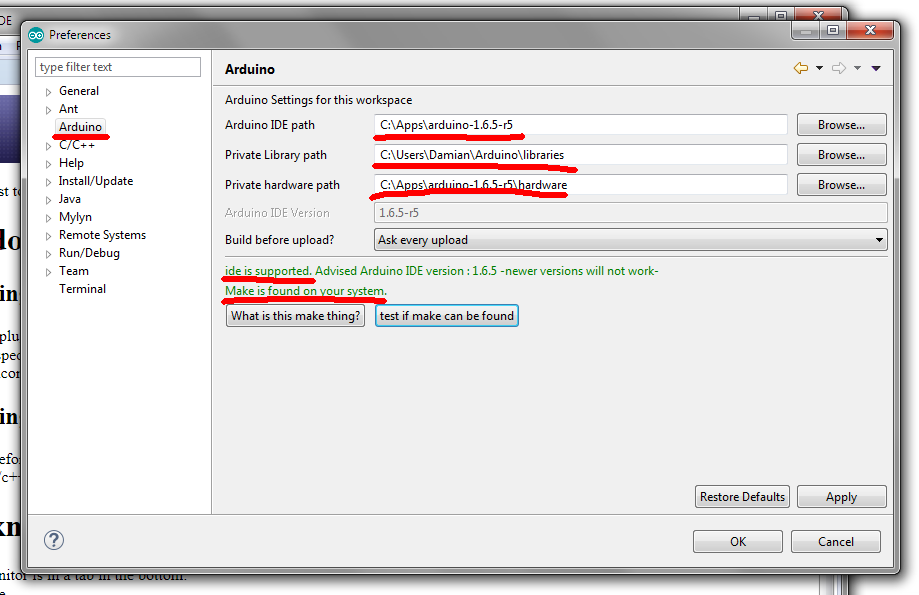
You should see green text:
ide is supportedIf
make.exeis on yourPATHyou can check test if make can be found and you should see greenMake is found on your system.If
make.exeis inhardware\tools\avr\binyou will seemake is not found on your systembut it still should work. - Apply
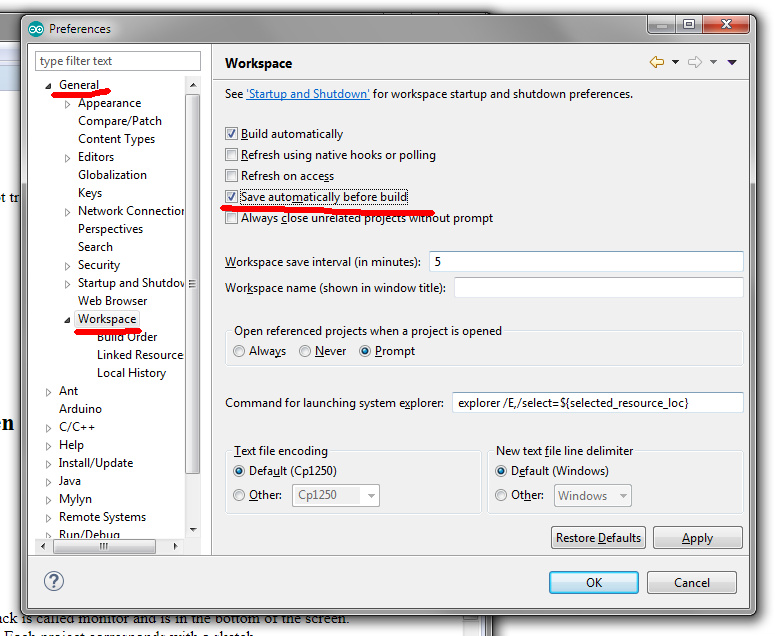
Set the save before build option
- Enter Preferences: Menu Window, Preferences
- select General, Workspace on left tree
- Mark Save automatically before build checkbox
- Apply
Add .ino and .pde as C++ Source
- Enter Preferences: Menu Window, Preferences
-
Select C/C++, File types on left tree
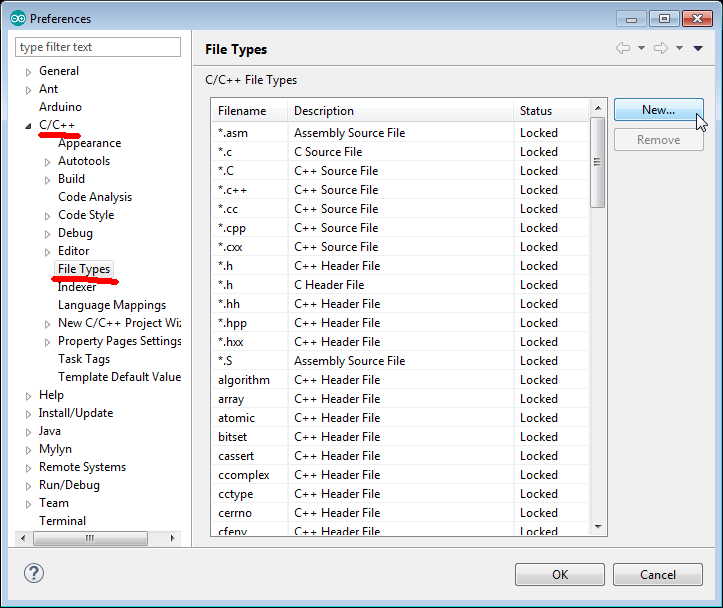
-
Press New.., enter
.inoand select C++ Source File, OK
-
Again press New.., enter
.pdeand select C++ Source File, OK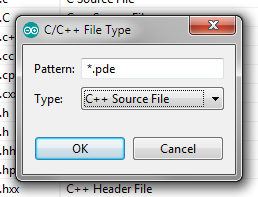
- Apply
Create and compile first Sketch
Create new Arduino Sketch based on blink example
- Connect your Arduino board to computer
-
Menu File, New, New Arduino sketch or press New sketch on toolbar
- Enter Project name, for example
hello, Next - Select your board and COM port, for example
Arduino/Genuino Uno,COM11, Next - In Select code choose: Sample Sketch. In Select Example code mark checkbox for
Blinkunder01.Basics, Next - OK
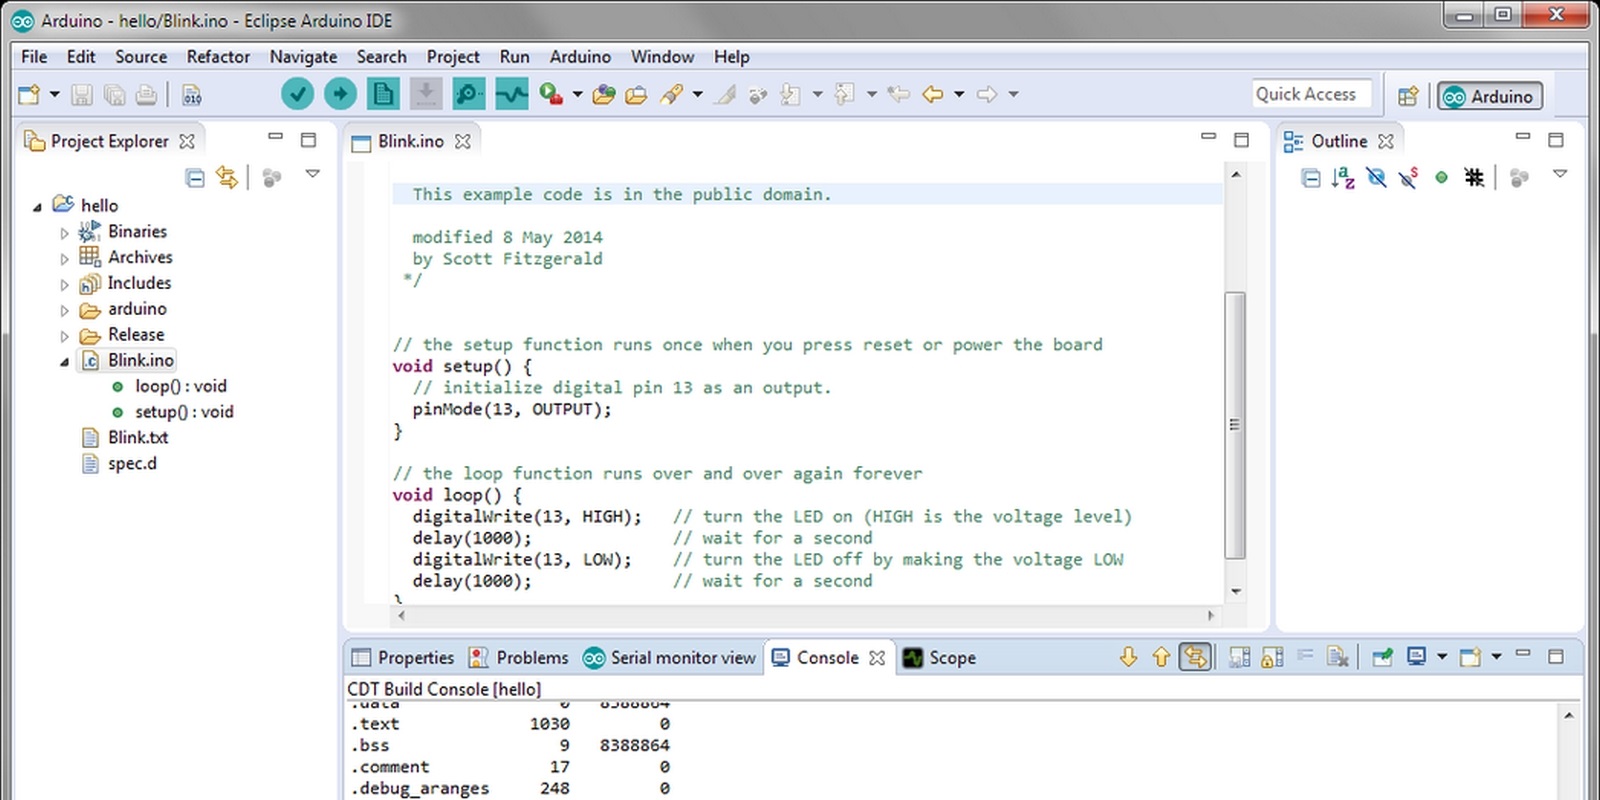
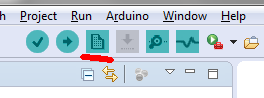
Compile (Verify) your sketch
-
Press Verify button on toolbar
On Console tab you should see many messages and at the end:
'Finished building target: hello'
Build Finished
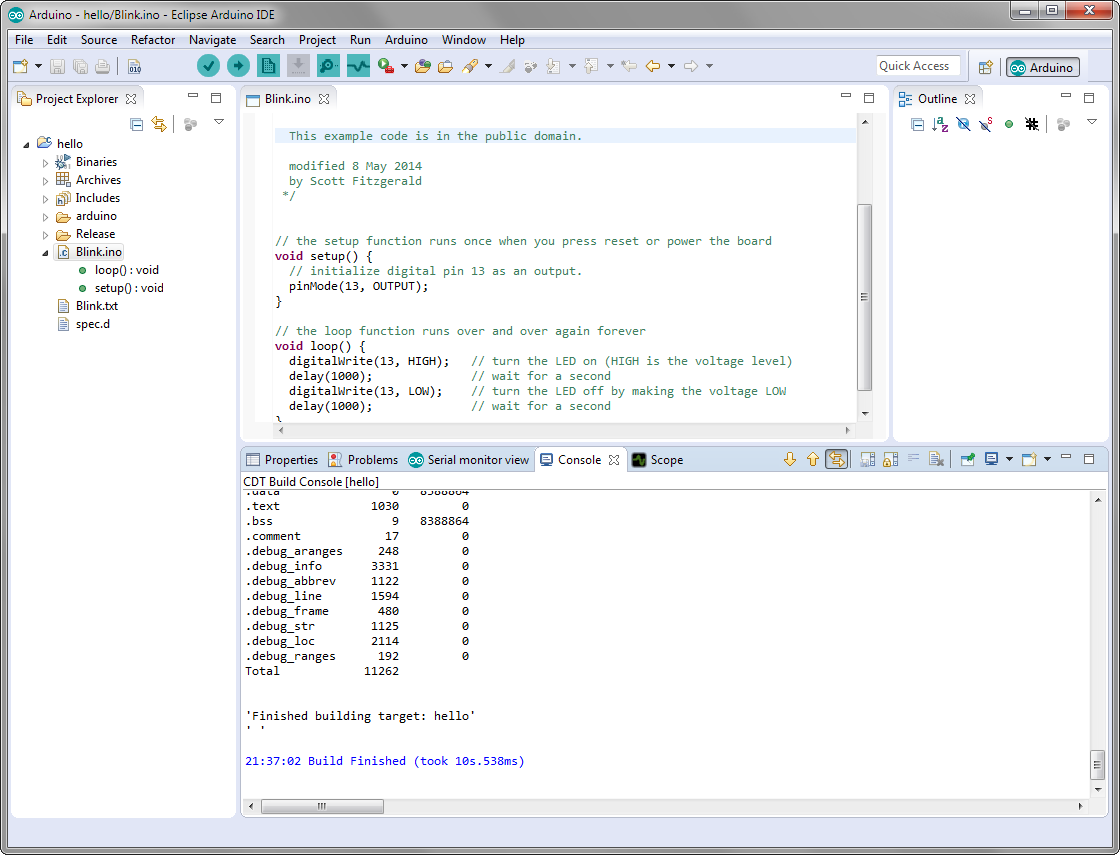
On Problems tab should be no red Errors
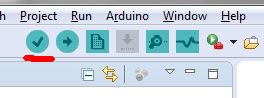
Upload your sketch
- Press Upload button on toolbar
On Console Tab you can see messages like this:
Starting upload
using arduino loader
Starting reset using DTR toggle process
Flushing buffer
Toggling DTR
Continuing to use COM12
Ending reset using DTR toggle process


Launching C:\Apps\arduino-1.6.5-r5\hardware\tools\avr/bin/avrdude -CC:\Apps\arduino-1.6.5-r5\hardware\tools\avr/etc/avrdude.conf -patmega328p -carduino -PCOM12 -b115200 -D -Uflash:w:C:\Apps\eclipseArduino-V2.4_win64.2015-12-06_20-24-02\workspace\hello/Release/hello.hex:i
Output:

avrdude: AVR device initialized and ready to accept instructions

Reading | ################################################## | 100% 0.00s

avrdude: Device signature = 0x1e950f
avrdude: reading input file "C:\Apps\eclipseArduino-V2.4_win64.2015-12-06_20-24-02\workspace\hello/Release/hello.hex"
avrdude: writing flash (1030 bytes):

Writing | ################################################## | 100% 0.18s

avrdude: 1030 bytes of flash written
avrdude: verifying flash memory against C:\Apps\eclipseArduino-V2.4_win64.2015-12-06_20-24-02\workspace\hello/Release/hello.hex:
avrdude: load data flash data from input file C:\Apps\eclipseArduino-V2.4_win64.2015-12-06_20-24-02\workspace\hello/Release/hello.hex:
avrdude: input file C:\Apps\eclipseArduino-V2.4_win64.2015-12-06_20-24-02\workspace\hello/Release/hello.hex contains 1030 bytes
avrdude: reading on-chip flash data:

Reading | ################################################## | 100% 0.15s

avrdude: verifying ...
avrdude: 1030 bytes of flash verified

avrdude done.  Thank you.

avr/bin/avrdude finished
upload done
And your Arduino board should blink!
If uploading is very slow and you see on Console tab:
avrdude: stk500_recv(): programmer is not responding
avrdude: stk500_getsync() attempt 1 of 10: not in sync: resp=0x39
it meanse you have communication problems.
Double check your cables and COM port number.
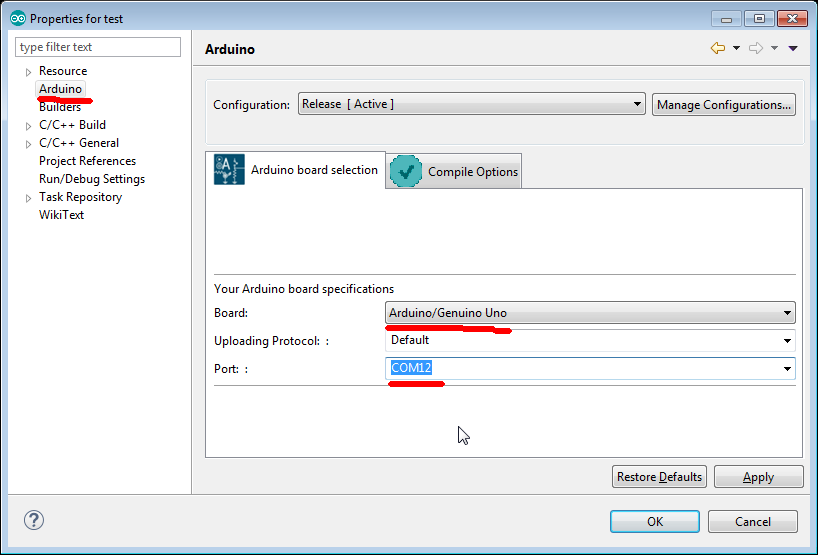
You can change COM port (or even board type)
- Select in menu: Project, Properties
- Select Arduino on the left tree
- Correct your COM port and/or board type
Create and compile Souliss sketch
Download Souliss
Open https://github.com/souliss/souliss/ and Download zip (https://github.com/souliss/souliss/archive/friariello.zip)
Unpack Souliss
Unpack souliss-friariello.zip to your Arduino library - the same you configured in Configure Arduino plugin step as Private Library path.
Rename souliss-friariello directory to just souliss.
Create new Arduino Sketch based on Souliss example
- Connect your Arduino board to computer
- Press New sketch on toolbar
- Enter Project name, for example
souliss-test, Next - Select your board and COM port, for example
Arduino/Genuino Uno,COM11, Next - In Select code choose: Sample Sketch. In Select Example code mark checkbox for
e01_HelloWorldundersoulissandethernet, Next - OK
Add libraries to your sketch
- Menu Arduino, Add a library to the seleected project
- Mark checkboxes on
soulissandSPI, Finish
Exclude some souliss file from compilation
Because all souliss files (both .h and .cpp) are actually included in your sketch, compile must not compile .cpp files. So you need to exclude them from compilation!
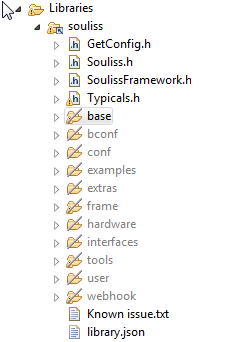
In Project Explorer, expand your project, Libraries, souliss, select all directories from base to webhook
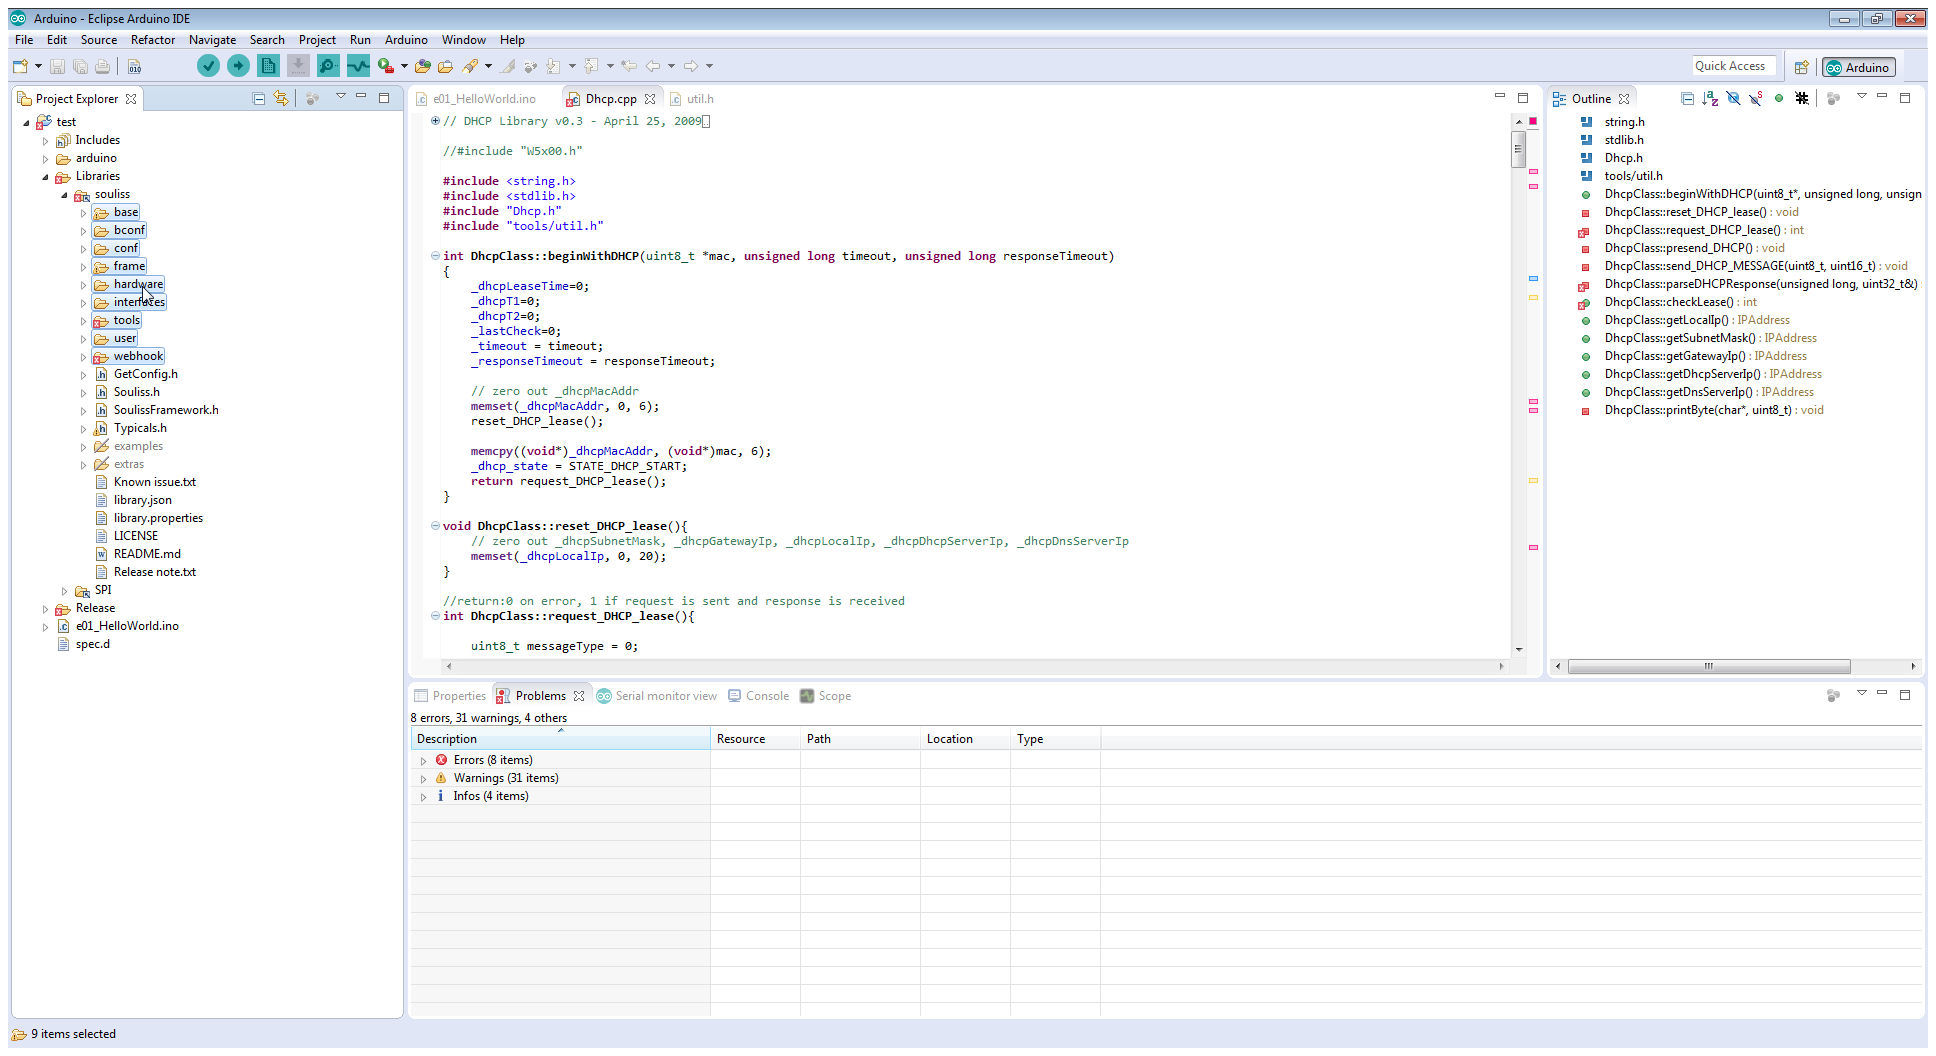
Then select from context menu Resource Configuration, Exlude from builds, Select all, OK
Directories base, bconf, … webhook should be grayed out:
Compile (Verify) your sketch
- Press Verify button on toolbar
Sketch should build without errors (but with many warnings - it’s normal) and you can upload it to board.